

Elementor Sites Aren't Slow: How to Optimise for Speed & Performance🚀
Is Elementor really the lost cause it's made out to be?

Welcome to our first Adventure together into the wonderful world of WordPress optimisation. We’ll begin at a familiar starting point for those begining their WordPress journey - Elementor.
New users love its acessibility and ease of use. But talk to more seasoned hands and a familiar gripe will often sound - performance! The Bloat-en-ator. But … are things really that bad?
Let’s find out. We’ll take a brand new Elementor site and put it through its paces, finding out what it takes to make it a performance powerhouse.
Step 1 - Install an Elementor site
I started a brand new WordPress site, and then set about complicating matters!
Added the Elementor plugin from the plugins directory
Added Royal Elementor Addons from the plugins directory
Created Google Tag Manager and Google Analytics accounts and added the tags to the site head
I imported one of the free kits (so a “done for you” site build) and then added several more widgets
I then duplicated the sections until I had a DOM size of around 1000 elements

Step 2 - Test the Speed!
We’ll take the site and put it directly into PageSpeed Insights over at https://pagespeed.web.dev/ We’ll just look at the Mobile score, as that’s the hardest to optimise for.
(Note that the scores on this site can vary quite a bit each time you run it, so they’re not a scientific evaluation but more of a guide)
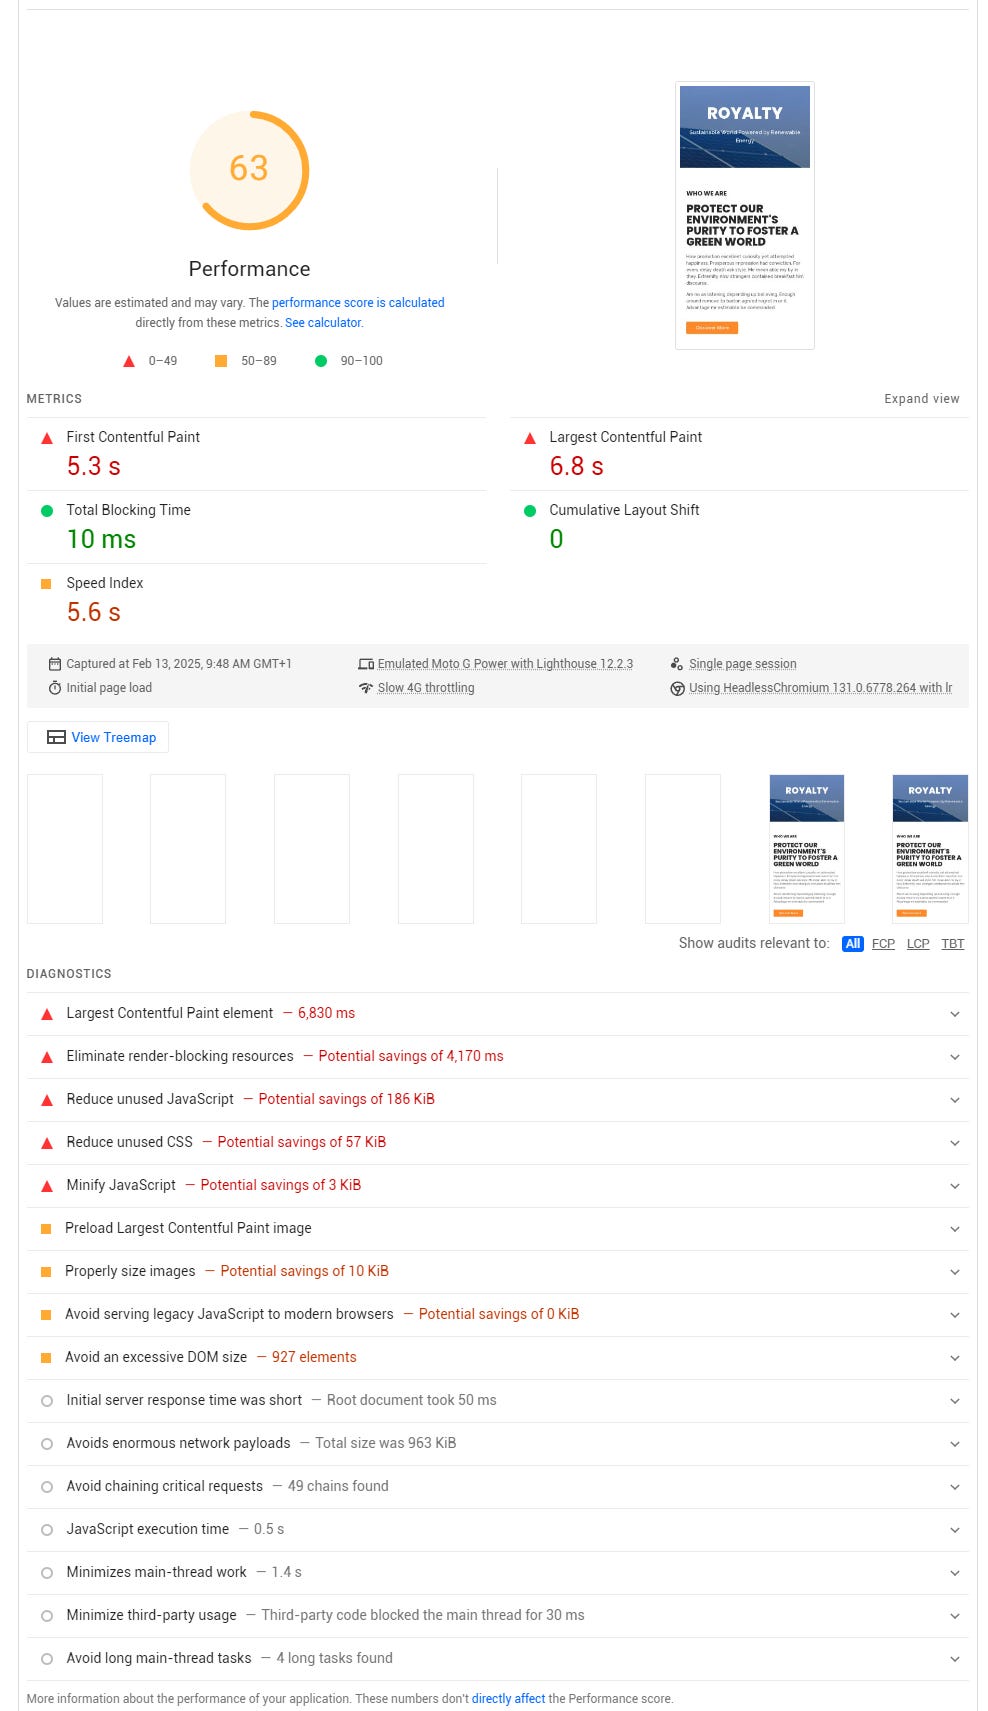
Here’s a our first run:
So … this is pretty typical for an unoptimised site. The good news is, it can be fixed. It’s possible to improve on every one of those warnings and get your site pretty close to a performance score of 100. Some bits are harder than others, however. Let’s start with the low hanging fruit.
Step 3 - Fix the “easy” bits
So, the easy fixes are:
Images
Optimising the images to next-gen formats
I used the excellent Compress X plugin
Deffering off-screen images
I used image lazy-load to achieve this, with SpeedifyPress
Properly sizing images
Once the images were lazy-loaded this went away
Expires headers for static assets
I used Cloudflare to do this, the setting in Caching > Configuration > Browser Cache TTL
Elements do not have explicit width and height
Mostly this went away with lazy loading, any left over can be set with SpeedifyPress
Root Document
Initial server response time
Caching with Cloudflare helped this
Render Blocking Resources
Google Fonts
I used Local Google Fonts to help here
Doing all that gets us…
Not much to look at there! OK. Let’s move onto the harder parts
Step 4 - Fix the “hard” bits
So, the harder fixes are:
Render Blocking Resources
CSS
I used SpeedifyPress to turn on Unused CSS. This removes any CSS from the page that isn’t in use.
Unused assets
Unused CSS
Again, this is an option in SpeedifyPress
Unused JavaScript
Once more, SpeedifyPress to the rescue here. I turned on delay Javascript.
Images
Preload LCP
SpeedifyPress helps here, automatically identifying the LCP and preloading it.
Root Document
Avoid an excessive DOM size
Guess what, SpeedifyPress again! The plugin will automatically find sections that are below the fold and wrap them in <template> tags, meaning they’re not part of the DOM for initial page load. On user interaction, they’re swapped back out again.
Doing that gets us…

So, we’re pretty much there. Every now and again when I run it it’ll come back with 100, but 99 isn’t good enough!
So, what’s up with the Speed Index of 3.7s? Well, after a bit of looking into it I realised I wasn’t lazy loading the image lazy loader, which was a left over from a previous project where lazy loaded images needed to appear snappily. Not so important here. I also realised that I was preloading the font-awesome fonts, which wasn’t necessary at all. With those two issues fixed, it’s a solid 100.

But, a caveat on this score:
Google Tag Manager is delayed and will load on user interation (or after 6 seconds)
So, we now have a decent score on Pagespeed Insights. But how does the site perform for users? Well, there are some issues, which means we’ll need to do some tweaking.
Step 5 - Tweaks for Elementor
With page speed optimisation, every site is different. We’ll often need to tweak each site (as sometimes each page within a site) for specifics that apply to it. These are the adjustments that were necessary here:
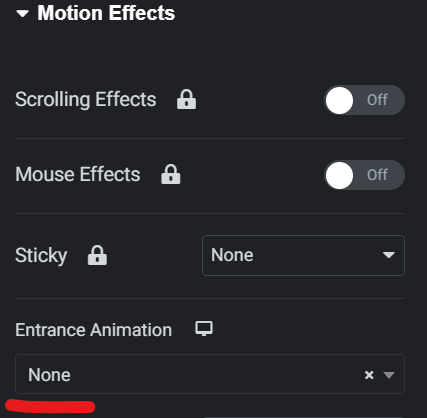
Removal of motion effects above the fold. The site delays the execution of all JavaScript until user interaction. So anything with a motion effect applied won’t appear until the user scrolls or clicks. That looks a bit weird for above the fold elements, so I removed the effects from those.
Change the load order for JavaScript files. The way Elementor works means that the front-end JavaScript won’t get triggered if you delay loading of the JavaScript files. Unless, that is, you load elementor/assets/js/frontend.min.js last. So I tweaked my code to make sure that’s the final JS file that gets loaded in.
Check for CSS that doesn’t look quite right and force the inclusion of certain style. On this particular site, I didn’t find any.
And there you have it, an Elementor web page that loads speedily and performs great for the users.
Check out the test site
You can check out the demo site here: https://elementor.speedifypress.com/ Feel free to run it through https://pagespeed.web.dev/ yourself!
Ok great, but how can I do it myself?
I’ve created a list of the tools and resources that I use here: Do It Yourself.
If you have a site that needs optimising you can Subscribe below. Paid subscribers get access to the SpeedifyPress plugin and get help from myself and the community on their individual issues.
(No time to wait and a high traffic site? Hire me!)